The glass used in windows is strong and durable and can last for many years, but it’s still glass, which means it can be prone to cracking or breaking if the material gets damaged. Whether from a stray baseball, severe weather, or simple age-related deterioration, broken window glass is a common homeowner challenge.
It’s important to note that a broken pane doesn’t automatically mean you have to replace the entire window. In most cases, you can simply replace the glass in the windows, saving significant money compared to full window replacement. However, understanding when DIY glass replacement makes sense versus when professional help is needed ensures both safety and long-term performance.
DIY Glass Window Replacement: Tips and Techniques
Because broken glass can happen unexpectedly, it’s best to have a repair strategy for installing replacement window glass before you need it, as well as the right tools and the right materials for the job. While window glass replacement may be time-consuming, it can also be a manageable DIY activity when you’re looking for a new project around your house, provided you take proper safety precautions and understand the process.
When DIY Glass Replacement Makes Sense
Single-Pane Windows: Simple, single-pane windows with traditional putty glazing are the best candidates for DIY replacement. These older window styles use accessible materials and straightforward techniques within most homeowners’ skill levels.
Accessible Locations: Ground-floor windows or easily reached locations make DIY work safer. Ladder work with sharp glass increases risk significantly.
Small Panes: Smaller glass panes (under 24 inches in either dimension) are easier to handle, measure, and install than large expanses of glass.
Time and Patience: Glass replacement requires careful, methodical work. Rushing creates safety hazards and poor results. Plan for 2 to 4 hours per window for your first attempt.
When to Call Professionals
Multi-Pane Insulated Glass: Double-pane or triple-pane windows with sealed insulating glass units require specialized equipment, materials, and expertise. These cannot be repaired with simple putty; they need complete insulated glass unit replacement. Learn when window repair versus replacement makes more sense for your specific situation.
Large Windows: Floor-to-ceiling windows, picture windows, or panes larger than 36 inches in either dimension pose handling challenges and safety risks requiring professional expertise.
Hard-to-Reach Locations: Second-story windows, windows over stairs, or locations requiring scaffolding are best left to professionals with proper safety equipment.
Historical Windows: Older homes with original windows may have historical value requiring specialized restoration techniques. Consider window replacement versus restoration options for historic properties.
Structural Damage: If the window frame is rotted, damaged, or deteriorated, glass replacement alone won’t solve the problem. Frame repairs or full window replacement may be necessary.
Materials and Tools Needed for Window Glass Replacement
When you’re removing a broken pane and installing replacement window glass, you don’t need a lot of things to do the job. Here’s a comprehensive list of the tools and materials you’ll need:
Essential Tools
- Heat gun: Softens old glazing compound for easier removal
- Putty knife: Removes old putty and applies new glazing compound
- Tape measure: Ensures accurate glass dimensions
- Small wire brush: Cleans glazing channel of debris and old compound
- Heavy gloves: Protects hands from sharp glass edges (leather or cut-resistant gloves recommended)
- Safety glasses: Protects eyes from glass shards and debris
- Drop cloth or heavy cardboard: Contains glass fragments during removal
- Utility knife: Scores old paint and caulk
- Pliers: Removes old glazier points
Materials
- Linseed oil: Conditions old wood frames before new glazing compound
- Glazing compound (putty): Seals glass into frame (use exterior-grade for outdoor exposure)
- Glazier’s push points: Metal fasteners that hold glass in frame
- Replacement glass: Cut to precise dimensions by glass supplier
- Primer and paint: Seals and protects new glazing compound
Optional but Helpful
- Vacuum with brush attachment: Removes small glass fragments safely
- Caulk gun and exterior caulk: Additional weatherproofing if needed
- Wood filler: Repairs minor frame damage
- Fine-grit sandpaper: Smooths glazing channel
Step-by-Step Strategy for Replacing Glass in a Window
Follow these detailed steps for safe, effective glass replacement:
Step 1: Safety Preparation and Glass Removal
The first thing you will need to do is remove the existing piece of glass. Safety is paramount when working with broken glass.
Safety Protocol:
- Wear heavy gloves (leather or cut-resistant)
- Wear safety glasses to protect eyes from flying glass fragments
- Lay drop cloth or cardboard below window (inside and outside) to catch falling glass
- Keep children and pets away from work area
- Have a sturdy cardboard box or thick plastic bag ready for glass disposal
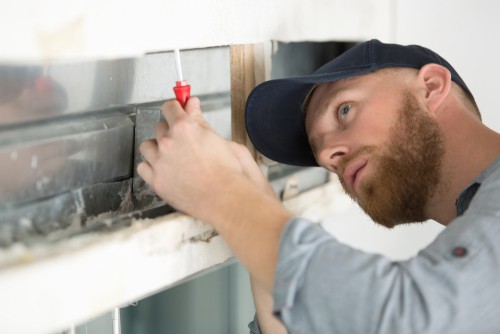
Removal Process: Carefully remove pieces of glass from the window frame. For cracked but intact glass, apply masking tape to the cracked areas before removal to help hold pieces together. If there’s a piece or two that won’t come out, use a heat gun to soften the old glazing compound that’s holding stubborn fragments in place.
Work methodically from one side to the other, gently loosening glazing compound and removing glazier points before attempting to remove glass. Never force or pull sharply, as this can cause glass to shatter unexpectedly.
Step 2: Clean the Window Frame and Prepare for Re-Glazing
Next, you will need to clean the window frame and prepare it for re-glazing. This critical step ensures proper adhesion and long-term performance.
Frame Cleaning:
- Use putty knife to scrape away all old glazing compound from the glazing channel
- Remove old glazier points with pliers
- Use wire brush to clean glazing channel thoroughly
- Vacuum or wipe away all debris, dust, and loose paint
- Inspect frame for rot, damage, or deterioration (address before proceeding)
Wood Conditioning: For older windows or dry wood frames, you may need to apply a bead of linseed oil with a brush to condition the wood before you apply the glazing compound. This prevents the wood from absorbing oils from the new glazing compound too quickly, which can cause it to dry out and crack.
Allow linseed oil to soak in for 30 minutes to 1 hour before proceeding. This step significantly improves glazing compound adhesion and longevity.
Step 3: Measure and Order Replacement Glass
Accurate measurement is crucial for proper fit and performance.
Measurement Process: Measure the area that’s to be glazed (the glazing channel dimensions, not the visible glass area). Measure width and height at multiple points, as old frames may not be perfectly square. Use the smallest measurements to ensure the glass fits.
Write the numbers down clearly, noting which dimension is width and which is height. Subtract 1/8 inch from both dimensions to allow proper installation clearance.
Ordering Glass: Use your measurements to order glass at your local hardware store or glass supplier. Make sure the dimensions are as precise as possible. Specify the glass type needed:
- Single-strength glass: For smaller panes (under 12 square feet)
- Double-strength glass: For larger panes or areas prone to impact
- Tempered glass: Required by code for certain locations (doors, sidelights, low windows)
Most glass suppliers will cut to your exact specifications. Some home improvement stores offer same-day cutting service.
Step 4: Install Replacement Glass
With a clean frame and new glass in hand, you’re ready for installation.
Dry Fit First: Before applying any glazing compound, test-fit the glass to ensure proper clearance. The glass should fit with 1/16 inch clearance on all sides.
Apply Glazing Bed: Apply a thin layer of glazing compound to the glazing channel (the surface where glass will rest). This bed cushions the glass and helps create a weather-tight seal.
Set the Glass: Carefully position the glass in the frame, pressing gently but firmly to seat it in the glazing compound bed. Ensure equal spacing on all sides.
Secure with Glazier Points: Use glazier’s push points to hold the glass pane in the frame. Install points every 6 to 8 inches around the perimeter, pushing them into the wood frame (not into the glass). The points should lie flat against the glass, holding it firmly in place.
Step 5: Apply Final Glazing Compound
This step seals the glass and creates the finished appearance.
Glazing Technique: Apply the putty using the putty knife, holding the knife at a 45-degree angle to create a smooth, angled bead. Press firmly to ensure good contact with both glass and frame, eliminating air gaps.
Smooth the bead of putty in one continuous motion to help get the most even line. Draw the putty knife along the entire length of each side without stopping or lifting.
Finishing: Tool the corners neatly, creating clean mitered joints where sides meet. Smooth any imperfections immediately, as glazing compound becomes harder to work as it begins to set.
Clean excess compound from glass with putty knife, then wipe glass with a damp cloth.
Step 6: Curing and Painting
Curing Time: Let the putty dry according to manufacturer instructions (typically 3 to 7 days before painting). The glazing compound needs this time to form a proper skin before paint application.
During curing, protect the new glazing from rain and extreme temperature fluctuations if possible.
Painting: Once cured, you can paint the glazing compound to finish and seal it. Use exterior-grade primer and paint. Extend paint slightly onto the glass (about 1/16 inch) to create a weathertight seal that prevents water infiltration.
Paint within two weeks of compound application for best adhesion and longevity.
Common DIY Glass Replacement Mistakes to Avoid
Inadequate Safety Precautions: Never work with glass without proper protective equipment. Glass injuries can be severe.
Rushing the Process: Hasty work leads to poor measurements, improper sealing, and safety risks. Take your time.
Skipping Wood Conditioning: Dry wood will absorb oils from glazing compound, causing it to crack and fail prematurely.
Using Wrong Glass Type: Tempered glass is required by building code in specific locations. Using regular glass where tempered is required creates safety hazards and code violations.
Insufficient Glazier Points: Too few points allow glass to shift or fall out. Use points every 6 to 8 inches for secure installation.
Painting Too Soon: Painting before glazing compound has cured traps moisture and prevents proper curing, leading to failure.
Not Addressing Frame Issues: Installing new glass in a rotted or damaged frame wastes time and money. Fix the frame first or consider full window replacement.
Understanding Insulated Glass Unit (IGU) Replacement
Modern double-pane and triple-pane windows use sealed insulated glass units that cannot be repaired with traditional glazing techniques. If you notice condensation between panes or a cloudy appearance, the IGU seal has failed and requires professional replacement.
IGU Replacement Process:
- Entire sealed glass unit is removed from sash
- New factory-sealed IGU is ordered to exact dimensions
- Professional installation ensures proper sealing and weatherization
- Warranty typically covers seal failures
Thompson Creek specializes in IGU replacement for modern windows, restoring clarity and energy efficiency without replacing the entire window. Understanding common window problems and solutions helps you identify issues requiring professional attention.
Is the Job Too Large or Difficult? Call Thompson Creek Window Company
Although it’s not always difficult to replace glass in a window, some windows are more of a challenge than others. For instance, if the window is a dual-pane or triple-pane window, then the replacement is much more complex and requires specialized materials and techniques beyond DIY capabilities.
When Professional Help is Essential:
- Insulated glass units (double-pane, triple-pane)
- Large windows (over 36 inches in any dimension)
- Difficult access locations (second story, over stairs, commercial buildings)
- Tempered glass installations
- Multiple broken windows
- Frame damage or deterioration
- Historic window restoration
- Time constraints (emergency repairs needed quickly)
The Thompson Creek Window Company can replace your windows quickly and affordably, whether you need simple glass replacement or complete window replacement. Our factory-trained technicians understand the nuances of glass installation, ensuring weathertight performance and long-term durability.
Frequently Asked Questions About Window Glass Replacement
How much does professional window glass replacement cost?
Professional single-pane glass replacement typically costs $150 to $400 per window depending on size, accessibility, and glass type. Insulated glass unit replacement for double-pane windows ranges from $300 to $800 per window. Emergency service, difficult access, or specialty glass increases costs. Thompson Creek provides free estimates for transparent pricing.
Can I replace just the glass, or do I need a new window?
For single-pane windows with intact frames, glass-only replacement works well. For multi-pane windows with seal failures, IGU replacement (not just glass) is needed. If frames are rotted or damaged, or windows are very old and inefficient, full replacement often provides better long-term value. Professional assessment helps determine the most cost-effective solution.
How long does window glass replacement take?
DIY single-pane glass replacement takes 2 to 4 hours per window for first-timers, less with experience. Professional replacement typically takes 30 minutes to 1 hour per window. IGU replacement may require ordering custom glass units (3 to 10 days) plus installation time.
What type of glass should I use for replacement?
Match the original glass type unless upgrading. Single-strength glass suits small panes (under 12 square feet). Double-strength handles larger panes. Tempered glass is required by building code for doors, sidelights, and windows near floors. Consider Low-E or insulated glass upgrades for better energy efficiency.
Can I replace broken glass myself, or should I hire a professional?
Simple single-pane windows in accessible locations can be DIY projects for handy homeowners with proper tools and safety equipment. Multi-pane insulated windows, large panes, difficult access, or lack of experience warrant professional service. Weigh the cost savings against safety risks and quality concerns. Learn more about professional window installation processes to understand what’s involved.
How do I dispose of broken window glass safely?
Wrap broken glass in several layers of newspaper or cardboard, place it in a sturdy cardboard box, and tape it closed. Mark the box “BROKEN GLASS” clearly. Check with local waste management for disposal guidelines; some areas require special handling for glass. Never place loose glass in regular trash bags where it could injure waste handlers.
Will new glass match my existing windows?
Standard clear glass matches easily. If your windows have tinted, frosted, or specialty glass, bring a sample to the glass supplier for matching. Slight variations in Low-E coatings between old and new glass may create minor appearance differences but don’t affect performance.
How long will DIY glass replacement last?
Properly installed single-pane glass with quality glazing compound should last 20 to 30 years before requiring re-glazing. Professional IGU replacements typically carry warranties of 10 to 20 years. Poor installation, inadequate sealing, or inferior materials significantly reduce lifespan.
When Full Window Replacement Makes More Sense
Sometimes replacing just the glass doesn’t address underlying issues. Consider full window replacement when:
Energy Efficiency Concerns: Old single-pane windows waste energy even with new glass. Modern ENERGY STAR® certified windows reduce heating and cooling costs by 20 to 40%.
Multiple Issues: Damaged frames, difficult operation, persistent air leaks, or outdated appearance suggest full replacement provides better value.
Frequent Repairs: If you’re constantly repairing windows, the cumulative cost often exceeds replacement cost.
Home Value: Replacing windows in old homes improves energy efficiency, curb appeal, and resale value significantly more than repeated glass replacements.
Safety and Security: Modern windows offer better security features, impact resistance, and egress compliance for bedrooms.
Thompson Creek specializes in custom-manufactured replacement windows designed specifically for Mid-Atlantic climate challenges. Our windows exceed ENERGY STAR® requirements while maintaining architectural character.
Why Choose Thompson Creek for Window Glass and Window Replacement
Since 1980, Thompson Creek has specialized in window services for Mid-Atlantic homeowners. Whether you need simple glass replacement or complete window replacement, our expertise ensures quality results.
Thompson Creek Advantages:
- Factory-trained technicians with decades of experience
- Custom-manufactured windows built in our Maryland facility
- ENERGY STAR® certified performance
- Professional installation backed by 50-year No-Hassle Warranty
- Honest assessment (we’ll tell you if glass replacement or full replacement makes more sense)
- Same-day emergency glass replacement available
- Free estimates with transparent pricing
When you choose Thompson Creek, you’re choosing proven expertise, complete accountability, and exceptional customer service.
Contact Thompson Creek Today
Whether you’re dealing with one broken window or considering whole-home window replacement, Thompson Creek provides expert guidance and quality solutions.
Need window glass replacement or considering new windows? Contact us today, and we’ll provide you with a free estimate for your window glass replacement or replacement windows.
Call (301) 901-5275 or request your free consultation online. Our window experts will assess your situation, explain your options, and provide honest recommendations for the most cost-effective solution.
Serving Maryland, Virginia, D.C., Pennsylvania, and North Carolina since 1980. Professional service, exceptional quality, and industry-leading warranty.