As the weather turns colder, your home’s heater will start cycling on and off more frequently. This will inevitably cause your winter energy bills to grow higher, the colder it gets outdoors. But if you take the time to winterize your home before it gets cold, you can make your home more comfortable and enjoy lower energy bills throughout the winter months.
In this guide, you’ll learn how to winterize your home in ten simple steps. Best of all, you don’t need to be a professional tradesperson to get the job done.
Step 1: Have Your HVAC System Inspected
It’s been several months since you last ran your furnace, so before you turn it on for winter, have it inspected by a professional to make sure everything is working as it should. This will not only help ensure that your furnace is working at peak performance, but it will also help you catch any potential problems while they’re still minor in nature.
Step 2: Find and Seal Air Leaks
According to the U.S. Department of Energy, air leaks can result in a 5% to 30% waste in a home’s energy use. Therefore, finding and sealing any air leaks is one of the most important tasks involved with winterizing your home. The most common culprits around the house include drafty windows, poorly insulated doors, cracks in the home’s exterior, and around pipes where they enter the home.
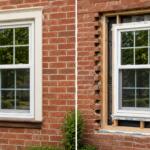
Step 3: Install Storm Windows and Doors
Installing storm windows can help you improve your home’s energy efficiency by 12% to 33%, and adding winter storm doors can improve it by an additional 12%. These renovations and the necessary materials will pay for themselves within five to seven years.
Step 4: Wrap Exposed Plumbing Pipes
If you have exposed plumbing pipes in your basement or garage, then be sure to wrap them in insulation to help conserve energy and to reduce the risk of them freezing.
Step 5: Get Your Chimney Inspected and Cleaned
Like your furnace, it’s been a while since you used your fireplace. Have it professionally inspected and cleaned, so it’s ready to go when you need it this winter.
Step 6: Check the Smoke and Carbon Monoxide Detectors
If you didn’t change the batteries in your smoke and carbon monoxide detectors when you turned the clocks back, then definitely do it now. After you install fresh batteries, test the devices to make sure they’re operating as they should.
Step 7: Clean Your Gutters
Cleaning your gutters might not seem like a winterization task, but it really is. The reason is because if you don’t clean them out, then water can collect and turn to ice, causing an ice dam on your roof. This will cause water to start pooling on your roof, and it will eventually seep inside where it will cause untold amounts of damage.
Step 8: Install an Insulation Blanket on Your Water Heater
When you aren’t using your hot water, it sits in the water heater tank where it is constantly reheated back to temperature. Wrapping the tank in an insulative blanket that’s designed for water heaters can help conserve the heat, reducing the number of times the water is reheated.
Step 9: Switch Your Ceiling Fans to Rotate Clockwise
Flip the directional switch on your ceiling fans, so the blades rotate clockwise. This will allow the fan to pull warm air trapped at the ceiling back down into the room where it can be recirculated.
Step 10: Trim Your Tree Branches
If you have long tree branches overhanging your house, trim them back before winter arrives. If you don’t, then you run the risk of ice forming on them, causing them to break from the weight. The last thing you want in winter is to have a tree branch break through your roof.
Winterizing Tips for a Homeowner
Thompson Creek has everything you need to maximize the energy efficiency of your home. From our custom-made windows and doors to our clog-free gutter system, we have the products you need to winterize your home. To learn more, contact Thompson Creek and get a free estimate for your winterization project.