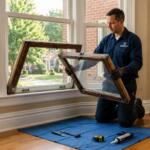
Window screens work hard to keep bugs, debris, and pollen out of your home while allowing fresh air to flow through. But over time, these hardworking barriers accumulate dirt, dust, and allergens that can obstruct your view and reduce air quality. If you’re noticing a cloudy film on your screens or reduced airflow through your windows, it’s time for a thorough cleaning.
Regular window screen maintenance not only improves your home’s appearance but also extends the life of your screens and enhances indoor air quality. For Mid-Atlantic homeowners dealing with seasonal pollen, coastal salt air, and varying weather conditions, clean screens are especially important for maintaining home comfort and energy-efficient windows.
When to Clean Your Window Screens
Most homeowners should clean their window screens at least twice a year—ideally in spring and fall. However, Mid-Atlantic homes may require more frequent cleaning due to:
- High pollen counts during spring and fall allergy seasons
- Coastal salt spray in areas near the Chesapeake Bay or Atlantic Ocean
- Urban pollution in cities like Baltimore, Washington DC, and Richmond
- Seasonal storms that deposit dirt and debris on screens
If you live in a high-traffic area or have allergies, consider cleaning your screens every 3-4 months to maintain optimal air quality and visibility.
Step 1: Remove Window Screens Safely
The most efficient way to clean your screens is to remove them all at once. Most double-hung windows feature screens that can be easily removed by:
- Opening the window fully from the inside
- Locating the tabs or clips at the bottom of the screen
- Pushing both tabs inward and lifting the screen up
- Tilting the screen slightly to remove it from the window frame
Pro tip: Label each screen with masking tape and a marker to ensure easy reinstallation. This is especially helpful if you have multiple window sizes throughout your home.
Lay all removed screens on a large tarp or drop cloth in your driveway, patio, or garage with good ventilation. Avoid cleaning on sunny days, as cleaning solutions can dry too quickly and leave streaks.
Step 2: Rinse Away Loose Debris
Before applying any cleaning solution, remove loose dirt, spider webs, and pollen with a gentle rinse. Using a garden hose set to low pressure, spray both sides of each screen thoroughly.
Critical warning: Never use a pressure washer on window screens. The high pressure can:
- Stretch or tear the mesh
- Bend the aluminum frame
- Create permanent damage requiring screen replacement
- Compromise the screen’s ability to keep insects out
For screens with heavy buildup, consider using a soft-bristle brush attachment on a shop vacuum first to remove dry debris before rinsing.
Step 3: Deep Clean with the Right Solution
For most screens, a simple mixture works best. Fill a large bucket with:
- 3 parts warm water
- 1 part mild dish soap (or ammonia-based cleaner for heavily soiled screens)
Alternative eco-friendly option: Mix equal parts white vinegar and warm water for a natural cleaning solution that cuts through grime without harsh chemicals.
Using a soft-bristle brush, microfiber cloth, or non-abrasive sponge, gently scrub both sides of each screen in circular motions. Pay special attention to:
- Screen edges where dirt accumulates
- Corner areas of the frame
- Any visible stains or discoloration
- Areas near trees or gardens with more pollen exposure
For Mid-Atlantic homes near the coast: Salt residue requires extra attention. A vinegar-based solution works particularly well for removing salt buildup that can corrode screens over time.
Step 4: Rinse Thoroughly and Inspect
After scrubbing, give each screen a final rinse with your garden hose on low pressure. Make sure to remove all cleaning solution, as residue can attract dirt and reduce screen longevity.
While rinsing, inspect each screen for:
- Small tears or holes in the mesh
- Bent or damaged frames
- Loose corners or separating seams
- Excessive wear that may indicate replacement is needed
Step 5: Dry Completely Before Reinstalling
Proper drying prevents water spots and ensures screens are ready for immediate use. You can:
- Shake off excess water by gently tapping the screen frame
- Wipe with a clean, dry microfiber cloth for faster drying
- Air dry in sunlight by leaning screens against a wall or fence (ideal method)
- Allow 30-60 minutes for complete drying in warm weather
Never reinstall damp screens, as moisture can promote mildew growth and attract dirt.
Additional Window Screen Maintenance Tips
Seasonal Screen Removal
Many Mid-Atlantic homeowners wonder: should window screens be removed in winter? The answer is yes. Removing screens during winter months:
- Increases solar heat gain by up to 30-40%, warming your home naturally
- Protects screens from ice, snow, and harsh winter weather damage
- Allows for easier window cleaning and inspection
- Provides opportunity for thorough screen cleaning before storage
Store removed screens in a dry location like your garage or basement, ideally somewhere they won’t be damaged by foot traffic or stored items.
Track and Frame Cleaning
While your screens are removed, take the opportunity to:
- Clean window tracks with a vacuum and damp cloth
- Remove built-up dirt from window sills
- Inspect weatherstripping for damage
- Check for common window problems like drafts or moisture
Clean tracks ensure smooth window operation and prevent dirt from transferring back to your freshly cleaned screens.
The Benefits of Clean Window Screens
Regular screen cleaning provides multiple advantages for your Mid-Atlantic home:
Improved Air Quality: Clean screens more effectively filter out pollen, dust, and allergens before they enter your home—especially important during peak allergy season in the Mid-Atlantic region.
Enhanced Natural Light: Removing dirt and grime allows up to 25% more sunlight to enter your home, reducing the need for artificial lighting and complementing your energy-efficient windows.
Extended Screen Lifespan: Regular maintenance prevents dirt buildup that can deteriorate mesh and frames, saving you money on premature replacements.
Better Views: Clean screens provide clearer views of your yard, neighborhood, or waterfront—an especially valuable benefit for Mid-Atlantic homes with scenic surroundings.
Reduced Energy Costs: In summer, clean screens allow better airflow, reducing reliance on air conditioning while maintaining insect protection.
When to Replace Window Screens
Even with regular cleaning, screens eventually wear out. Consider replacement if you notice:
- Multiple tears or holes that allow insects inside
- Bent or warped frames that don’t fit properly
- Excessive discoloration that cleaning doesn’t remove
- Rust or corrosion on metal frames
- Sagging mesh that no longer fits tightly
Quality replacement screens are essential for maintaining your home’s comfort and efficiency. When it’s time for new screens, ensure they’re properly matched to your window type and frame dimensions.
Frequently Asked Questions
How often should I clean my window screens?
Most Mid-Atlantic homes benefit from cleaning screens twice annually—once in spring before pollen season peaks and once in fall before winter storage. Coastal homes or those in high-pollution areas may need quarterly cleaning.
Can I clean screens without removing them?
Yes, though results aren’t as thorough. Use a vacuum with a soft brush attachment on both sides, or gently wipe with a damp microfiber cloth. This method works for quick maintenance between deep cleanings.
What’s the best homemade screen cleaner?
Mix equal parts white vinegar and warm water, or use 2-3 tablespoons of dish soap per gallon of water. Avoid harsh chemicals that can damage screen mesh or frames.
Should I remove screens during Maryland winters?
Yes. Removing screens during winter increases solar heat gain, protects screens from winter damage, and makes it easier to maintain your replacement windows.
How do I prevent screens from getting dirty quickly?
Regular light cleaning, seasonal removal during winter, and ensuring proper window seal integrity all help minimize dirt accumulation. Well-maintained windows with good weatherstripping reduce debris transfer to screens.
Why Choose Thompson Creek for Your Window Needs
Thompson Creek has served Mid-Atlantic homeowners since 1980, manufacturing custom replacement windows and doors specifically designed for our region’s unique climate challenges. Our windows feature easy-to-clean screens and tilt-in sashes that make seasonal maintenance simple and safe—no ladders required.
Every window we manufacture in our Maryland facility comes with ENERGY STAR® certification, 146 mph wind resistance, and our industry-leading 50-year No-Hassle Warranty. From design through installation and service, we provide complete accountability so you know exactly who to call when you need support.
Ready to upgrade to windows that make maintenance easier? Schedule your free consultation with Thompson Creek today. Our custom-manufactured windows and professional installation have helped thousands of Mid-Atlantic homeowners improve energy efficiency, home comfort, and curb appeal for over 40 years.